Sunday, July 14, 2013

Coastal Pearls - String of Pearls Quilt-Along - Part 2

All of the navy accents are now attached.  Each pearl again was attached to a long navy strip and then cut apart...

And the pearls have been pressed...

And trimmed to size.


I really enjoy the monotony of the chain piecing.

And the piles of blocks it creates.

What I enjoy less is the construction of the strip sets along with the pressing and cutting of each next piece.  There are 42 pearls in this quilt.  Thus 168 accent pieces to apply, press and trim - but these are easy as the pearls are sewn onto long strips. And 168 more border pieces to apply, press and trim - and this is where the tedium sets in, as I have to cut all 168 before adding them to the pearls.

Because I'm working slightly differently - more pearls, but smaller as I'm using a charm pack - I had to recalculate the number of strips needed.  The pattern calls for 4.5 strip sets. Turns out, I need 5.5. From the math, it would seem that I can get enough from from 5 - but the pesky selvages leave me with one fewer border piece than I would hope for on each strip set - thus the half set.

At the end of the day, 1 border piece had been attached to each pearl. Next steps - add the second short borders, press the short edges, complete the strip sets for the wider border edges and cut 84 of those - then apply, press and trim all blocks to size.  The next lesson in this Quilt-Along will be posted July 17th, so there is plenty of time.

Thursday, July 11, 2013

Carolina Dogwoods


My how time flies when you are having fun.  On June 29th, I took a day for myself and spent it at Thimble Pleasures taking a course from Annette Ornelas - Carolina Dogwoods. The technique in the class is one that Annette developed herself - which creates the illusion of curved piecing without the pain of curved piecing.  By the end of the day, I had a completed top for a lovely wall hanging.  There were seven of us in the class - and each of us had a dramatically different colorway.


Annette is clearly an experienced and flexible teacher. She was able to work successfully with a variety of skill levels from a woman who had never made a quilt top (but fortunately had lots of experience in garment making) to experienced quilters. Carolina Dogwoods is an intermediate level pattern. I am somewhere around advanced beginner - so this was a great fit for me. One of my friends in the Quilt Bee was also in class, so we had a good day.  Annette was able to move from table to table, coaching us at the point where we were, moving us on to the next task, without leaving me feeling rushed or neglected.


The quilt block is constructed from the center - outwards. And parts of it remind me of folding origami.  The key is to remember to sew perpendicular to the folds rather than parallel as a parallel seam results in in a fabric loop rather than something that can be folded.

Before gluing the corners down for the flower centers - we pre-curved the centers. This is small detail work. The seam along the edge is about 1/8th inch and will be covered by the layer of triangles - which will be curved once I start quilting the piece.

An alternative is to leave the centers straight, but to me that was a bit blocky for my taste.

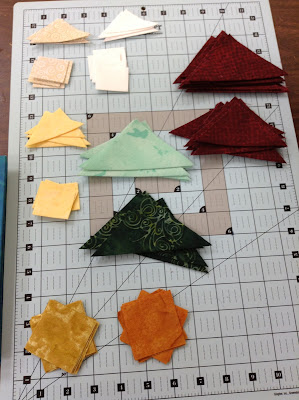
We then built the center -edge pieces for each petal which feature a triangle of background fabric (triangular once the tip of the diamond (from the fold) is trimmed off.  Those bits will be curved during quilting as well.

Finally, we created the corners of each petal. These are three layers - body of petal, accent color (gold) and background.  The accent triangle is folded to the back and then the petal piece is glued to the background square.


A seam is basted roughly 3/8 to 1/2 inch from the edge in order to keep the petal and background together while completing the flower assembly.

Once the components are complete - the flowers go together as a 9-patch block.

The leaf blocks are next - again a sequence of gluing the points of the triangles in place - stitching together the two halves of the block and gluing on the background points.


These will be curved during quilting.


Finally - a few variations of color order. When I started the wall hanging, I thought I would prefer the yellow dogwood over the gold swirly one - but it turns out, I really like the gold swirly one better. My colorway is based on Florida State colors - not necessarily dogwoods found in nature.

Once the top is assembled, it is time to press the accents into submission and pre-curve the petal corners. The reason for this is that the background and accent fabrics show through the white and yellow (and most of the light colored fabrics). So if the curving is stitched down prior to basting the top, then the excess fabric can be trimmed away. After the curves are stitched, the line of basting stitches is removed.

I was one of the few who left with the borders on the quilt and the pre-curves done on the petals.  I did find an area where a seam pulled apart during construction - after I applied the borders. Fortunately, I was able to sit at home and fix that by hand (as the attempt to fix on my machine failed miserably). Next step for this one is to choose a backing and assemble the quilt sandwich. Quilting this will be fun!

Tuesday, July 9, 2013

Aiming For Accuracy - or A4AQA Blue & White - part 1.

I decided to pull from my stash of blue and white fabrics. The background will be a white on white.  I've been planning a blue & white quilt, though didn't know what pattern I wanted to use, so I have plenty of fabrics to choose from!  I thought about a garnet/gold colorway - but had too much of a mixture of batiks and quilting cottons in my red/garnet stash - and didn't want to mix the two for this project.

The first task was to cut the background fabrics - with an important reminder to label them by size so that they are easily pulled when they are needed for a particular block.  I've also trimmed a few extra sashing strips, just in case I mis-measure a length along the way.  The lesson was an overview in improving accuracy through careful cutting, mastering a 1/4 inch seam and easing fabrics where necessary.

I worked on Lessons 1 and 2 together. The lesson 1 fabric and cuts are on the top of each picture.


Lesson 1 highlights pressing seams.  The block is straightforward - and I made my first ever half square triangles.  I can definitely use some practice with those. I will likely re-read part of Quilter's Academy Volume 3 as there are many ways to construct half square triangles - so I can try multiple techniques in the coming months.


One thing that is clear to me, is that I need to practice looking in front of the needle versus at the needle while feeding in the blocks.  My seam lines could have been straighter - but I was able to "correct" the wobblies when I pressed and trimmed the blocks.

The block looks quite different depending on the placement of dark and light.

I opted for the dark triangles and light spokes in the end.

Lesson 2 highlights pinning and easing. I use very few pins when constructing blocks.  However, there are times, when in the fiddly bits, that pinning can be very useful.

Again, I played with the position of the half square triangles. As the value of the fabrics in these are similar, it was less obvious which direction I chose, so I picked one.  I did misread the directions, and have four extra large half square triangles - so this color combination will likely repeat itself in an upcoming block - especially if I can cut the big blocks into two smaller ones.


Lessons for this quilt-along come out on Thursday afternoons.

Monday, June 24, 2013

Coastal Pearls - String of Pearls Quilt-Along


 String of Pearls is a Quilt-Along organized by Christa at Christa Quilts.  I've chosen a charm pack by Moda called Ocean View for my pearls.

I'm following about a half step behind as the charm packs are 1/2 inch smaller than the directions given. Also, I prefer strip piecing the charms onto the accent strips - and then trimming rather pre-cutting the accent strips for the boxes.


The short strips fit eight charms each. So far I've used 5 and a quarter width of fabric navy strips.


The next step will be to cut these apart and press the first sides. Then on to the next 5.25 strips.

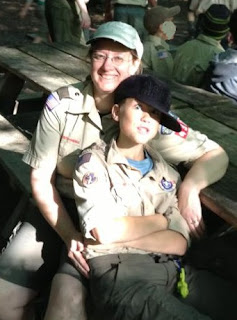
I took a break from quilting over the weekend and went to South Mountain State Park with our Boy Scout troop. We hiked about 10 miles up and down the mountains on Saturday.


Tuesday, June 18, 2013

Bits and Pieces

I'm in wrap-up and get started mode at the moment.  Last night, after an energizing guild meeting - the Durham Orange Quilt Guild, I came home inspired to at the very least finish my Fussy, Fiddly Threads Sampler. Sarah Ann Smith gave a fun and inspirational talk about her creative process.

 Step 1 - finish outlining the leaves and add some decorative quilting.


 This is very much a free-form project.  I broke the glitter thread two more times before figuring out that perhaps I needed to reset the tension on my machine. That allowed me to finally get those squiggles done.  I think my favorite thread on this project is the variegated.  It was fun to "paint" with it and see the leaves come to life. By the time I reached the last cluster, I decided to go even more free form and ignored some of the leaves that I originally sketched out.


So - even more energized at this point, I decided it was time to pick out the fabrics for the Aiming for Accuracy Quilt Along.  I started off with two color-ways in mind - a Red/Gold option or a Blue/White.  The recommendation is for 24 fat quarters - but that is as detailed as she gets.  My reds and golds are pretty evenly divided between regular and batik fabrics and I decided I didn't want to bother with mixing those in this project, so I pulled 21 different blues out of my stash.  The contrast (sashing) will be a white on white.  I will have to be careful of the placement of the heavily white & blue fabric (center front) so that it doesn't get lost against the sashing. I will probably add another navy and another dark blue.


I had completely forgotten about signing on for Christa's String of Pearls Quilt Along - and then found my set of charm packs again - so pulled together some coordinating fabrics for those as well. The striped backing is either a bed cover or table cloth that I found when I was helping clean my grandmother's house in February. That will be used as backing to make this into a picnic/beach appropriate quilt as it is a heavy fabric.


Finally, I decided I needed to play some with Mollie. I finished the vertical stitch in the ditch on the Sandy Breeze and still need to do some horizontal lines (I'm using water soluble thread so that I can practice and get a feel for how to maneuver the quilt without the stress of "perfection") and started to think about how I want to quilt these 15 inch blocks.  This little 5 inch stencil would get lost if I placed it onto each block, and I'm not sure I'm up to that many echo repeats to get it from 5 to 14 inches. I think instead that I will scatter these randomly around the center of the quilt.  I forgot to mark the quilt before basting it, so I may instead trace the design onto Golden Threads paper and unpin one section at a time to work on it.  Last night I proved to myself that I can follow the drawn line reasonably well, it will improve with practice, and my echo quilting isn't horrible - also room for improvement which I expect I'll see with practice.  This sample was done with the water soluble thread as I didn't want to unthread/rethread Mollie last night - so I will get much more mileage out of the sample sandwich.