Sunday, January 27, 2013

Updating my Sewing Space - The New

Bit by bit, Gus and I emptied his bedroom into the hallway, living room and dining room - I will spare you the pictures as I didn't take any to protect the hoarder in my house (me).  At the same time, we had to empty the spare bedroom/junk room, disassemble a futon to give away, clean carpets and get him set back up before school started back in January.  I think there is still a cabinet in there that needs to be cleared out, and some of our book collection needs to be removed, given away or stored so that he can take advantage of the built in bookshelves - though if we put that off long enough, he will be heading to college in about 6 years...

The reason for the move, rather than setting myself up in the spare bedroom/junk room is lighting. Our house is just not well lit.  And Gus's bedroom does not get much natural sunlight. My sewing room has better sunlight and allows me to look out the front of the house and see him playing basketball in the court or riding his bike with friends.  The overhead fixture is not up to the task of providing adequate lighting, so I've been taking advantage of sales to add to my collection of Ott lights. I have a floor lamp that I found at Home Depot (not on sale, still less than half the price of the ones at JoAnn Fabrics), a bendable desk lamp that I don't remember where I got - it was in my scrapbook gear mostly used at retreats, and two that I purchased on Thanksgiving from JoAnn's online sale (more than 50% off).  Tragically, the on/off button does not work on one of those... at least it is stuck in the "on" position - so I can turn it on and off using the power strip, which does force me to remember to turn off the power strip which is now on the windowsill so that I can reach it easily.

My big board is sitting on top of the four Rubbermaid containers of fabric along one wall next to the closet - which is actually an ideal height for cutting and pressing - but less than idea for searching the stash for the "just right" fabric...  Better organizing my stash is an ongoing and upcoming project.

Two features I really like in the room are the shelves which can easily hold my quilting reference library and the wall above my cutting station which now holds my ruler and stencil collection.  I'm also enjoying having a little flat screen TV so that I can listen to movies while I work. Less so the Wii in the other corner, but at least Gus plays most games with the sound off so that he doesn't drive me nuts with it.

There are still several things which need to be improved and better organized - like the stash of scrapbook and card making supplies. We are gradually purging the closet of baby items so that I can store stuff in there as well.

Sunday, January 20, 2013

Updating my Sewing Space - The Old

At the start of 2012, I embarked on the task of moving my (now) 12 year old son from one bedroom to another. Midway into the week that I planned to complete this, I got sick - nothing serious - but enough to put me on my back for another week or so. So, this is a task which is still not quite done.  I need to plow into the piles in both bedrooms and get things organized (mostly it is a matter of putting stuff away).

My original sewing space was in the corner of our bedroom, which while offering easy access to the "design bed" was not the most conducive to setting seams, layering quilts or leaving projects out to be worked on later. Eventually the table became a dumping ground for folded laundry that didn't get put away quickly enough and stacks of books.  Plus, having the big board propped against the bed when not in use wasn't always the best option for clumsy corgis or their people.  Thus the creation of my sewing space started.


Reading through lessons in Volumes I and II there are a multitude of good tips and things to consider for optimal sewing and comfort. I set out one day before the move to try out chairs as I have a chronically bad back, and sitting on the hijacked dining room chair or the borrowed office chair from Gus's room wasn't doing my back any good.  I spent an afternoon sitting in chairs at Staples and found a wonderfully supportive mesh chair.  One glaring problem became apparent after I got the chair home and assembled.  2 points to the person who can figure it out from this picture... okay, I'll give you the answer - the ARMS.  The arms on this chair do not change height - a detail I neglected to check on at the store, and I don't think I can remove them either as they are a part of the frame (though it may pay to flip the chair over and figure it out).  Because of the shelf under the sewing table, I can't get the chair comfortably close to the sewing table. I've been trying different configurations without success, and I'm to a point of trading my nice comfy chair to my son for his cheapo office chair which fits quite nicely. I've tried lowering the seat and using a disk similar to the dyna disk recommended in Volume II, but that still doesn't solve the arm problem.  I may have to go back to the drawing board on the chair issue.  This puppy is HEAVY - and it also doesn't roll well on carpet.

Monday, January 14, 2013

I will never skip the starch again!


On Saturday, I joined members of our guild at a charity quilting event to assemble quilts which will be distributed to families affected by Hurricane Sandy.

There were four pressing stations set up around the meeting hall, and I did not remember to pack starch or Best Press, figuring there would be some there.  I was a few minutes late, so may have missed some early announcements about NOT using sprays, but did not see anyone pressing with starch or Best Press (wonder if there was a concern about overspray onto the carpet or mucking up the irons).  Anywho - pieced happily for most of the day (except for one side trip - more later) and stopped at the point I needed square the 12 blocks to 15.5 inches.  I reached that point around the time people started packing up, even though it was scheduled until 4:00. I tried to get started, using two rulers to figure it out as my biggest was a 10.5 inch square, and then gave up realizing that I was seriously overheated and more than a bit dehydrated.

Sunday morning I decided to squeeze some work on the quilt in prior to hiking with Gus and his patrol and again faced squaring the blocks.  I started measuring and quickly computed that the 15.5 inch blocks were going to end up between 14.75 and 15 inches.  Then looked more closely at the seams and a light bulb went on.  There was no starch, and the blocks that I had carefully rolled up on Saturday afternoon were extremely wrinkled and looking suspiciously full around the seams.  Out came the starch.

After spraying all of the blocks, I started the evening process - first making certain all 48 block sides were cut straight and corners squared.  Measuring across the blocks as I went, they ranged from 15.25 inches to just over 15.5 inches once squared - with most being about 15.375 - so 15.25 ended up as my final target.  I carefully shaved 1/8 inch bits, and was successful on 47 of those sides. There is a pin on the 48th to remind me to be careful with that block as it is a little less than 1/8 of an inch too narrow.

Starching made a HUGE difference in the squaring and accuracy.  I hope to never have to skip that step again.

On a side note, midway into piecing the initial strip sets, my Bernina 801 stopped working.  Motor ran fine (could still wind a bobbin) but turning the hand wheel was excessively tight and I was afraid to force it.  So I headed over to my local quilt store to drop the machine off to be serviced (had the same problem about 15 months ago - and we thought it was fixed - but I also didn't use the machine again and it has been safely in its case for those 15 months). Apparently it worked fine this morning when she started to service it, but after we spoke, she ran it longer to find where there was a "bind" in the main shaft.  This is now repaired and ready to retrieve this evening.  While the LQS was 5 minutes in one direction, my house is 20 in the other from our gathering, so I did lose a bit over an hour running home to collect my Bernina 830 - which does not have a carrying case, so I generally don't take it along and return to the gathering.  I think in switching the seams, that the 1/4 inch tape was probably a little off - and I didn't bring scraps along - figuring consistency in seam allowance was the goal - so that may also have contributed to the blocks being a smidge smaller than intended.

 Our hike was a great success. Gus completed the second to last requirement he needs in order to earn Second Class.  Two other members of his patrol and a new scout to our Troop joined us as well, along with three other parents. It was in the low 70s here in North Carolina - unseasonably warm for North Carolina - and a beautiful day to be out walking.  The boys voted on Sweet Frog Frozen Yogurt to end the afternoon.


Tuesday, January 8, 2013

Chance Encounter of the Best Kind

I had to take the bus up to main campus yesterday to meet with some of my students.  A woman boarded the bus the stop before I was to get off and looked over and quietly said "Great Book."  I stayed on an extra stop to chat briefly and was tempted to stay on the bus longer but would have seriously inconvenienced my students.  Wish I'd gotten her name.

I'm currently reading Volume 2 in anticipation of being able to complete Volume 1 in the next few weeks.


Friday, January 4, 2013

Quilting in the New Year

2012 was a good year in many ways, but not so much in terms of being productive quilting.  I did accomplish several neat projects along the way, including creating a dedicated sewing space for myself.  This is still a bit of a work in progress as I have a few lingering piles of stuff to purge and store. And I think I need to rearrange a few bits of furniture as I'm feeling a bit claustrophobic. Would also like a better stash storage system. While the rubbermaid tubs are handy for storage, not so great for quickly finding an item - plus as they are supporting my cutting/ironing station, I have to dismantle that in order to get into the tubs.  More on this in a different post.

One quilt in particular stymied me last year.  And it sat and sat and sat, taunting me.  The Fire Truck Irish Chain is nearly DONE!  It is not beautiful, and I'm hoping once washed it will shrink enough to hide my quilting.  As with other quilts, I learned a lot along the way to completing this one.


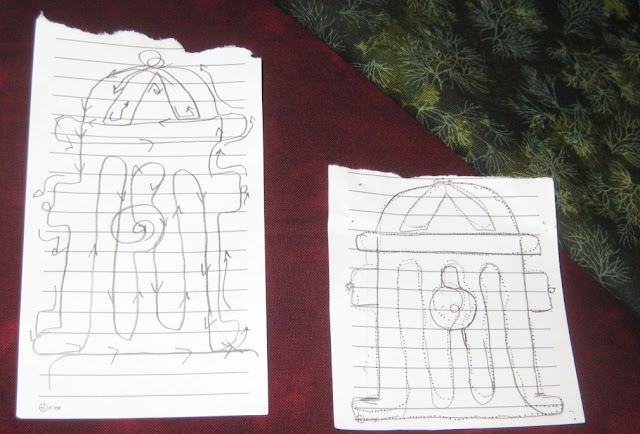
A few weeks ago, I Google'd to find line drawings of fire hydrants - and then sketched several until I found a design I liked - and one I thought I could replicate on a sewing machine.  It turns out I greatly overestimated my free-motion abilities... need to do much more practicing before trying a tight motif like this again - BUT the quilting is done.  I stitched the design without thread, and at too high a speed, as evident by the short stitch length.  Then redrew so that I would have a guide for which direction to stitch to keep it a continuous line design.  Each one is a little different.

After finishing the center of the quilt, I then needed to figure out something for the borders.  And again, the quilt sat and sat and sat. My first idea was to trace some of the fire trucks in a repeating design around the border. But after spending so much time on 17 fire hydrants (and then plucking out the golden threads paper scraps) that was a bit daunting.  Finally on December 31st I returned to Google and searched for a flame motif I could adapt around a border.  I came to my senses and then using a chalk pen drew a freehand flame and loop motif around the border - and stitched it.


So - what did I learn?

  1. PRACTICE the basics of FMQ before starting the next detailed project. I took this quilt with me to the Melody Crisp workshop I attended last March, and she suggested edge to edge straight line quilting off the points of the chains - which of course by then had been stitched and all threads buried from inner border to inner border. I will remember that for the next kids quilt.  Her point is that for a quilt that will be loved and dragged behind a three or four year old that simple quilting is perfectly okay.
  2. Little detailed motifs are much easier to draw than to follow on a sewing machine... especially when your closed toe foot gets caught under the paper on the way in (may have to try taping rather than pinning the Golden Threads paper next time I use it.  Refer back to point 1- more practice is needed.
  3. DONE is better than not done!
  4. REALLY IMPORTANT! When unpinning a border because it is well anchored, both by water soluble thread and previous quilting - it is a good idea to leave pins in the corners.  When I flipped the quilt over before trimming it, I found that I had crumpled the backing in not one but 2 corners - unfortunately, I thought it was only 1, so I had to make 2 trips back to the machine to restitch the border corners as I found the second error while trimming that corner - fortunately I hadn't made a fatal cut yet.
  5. Watch out for the open toe foot - which is, at least for me, much easier to use when following a pattern - I managed to catch it under a line of stitching at least once.
  6. SLOW DOWN!  Quilting is not a race - and when I slowed down, it was much easier to follow my pattern.  I am also adjusting how I work the foot pedal to reduce stress - though this is still a work in progress.
  7. I'm not wild about my chair.  From a support perspective it is great for my back. But the arms are not adjustable - a key factor I missed while sitting and testing a few dozen chairs one afternoon - and it makes it very hard to get close to the machine because of the way my table is built.
  8. Pressing and starching the binding after attaching it makes it easier to work with - the last few quilts, I felt like I was wrestling with the quilt to get the binding to fold over.  The binding was made months ago, once I decided which print to use to bind it.  Turns out, I really like making binding strips - kind of relaxing.
  9. Think outside the box for quilting motifs...  Initially, I fixated on the Irish Chain and felt the need to to "frame" a quilting motif inside each Dalmatian square. I wanted to avoid an all-over meander/stipple. A few days ago, reading someone's description of how they practiced free-motion quilting, I had an epiphany - which will be saved for future quilts... look to the backing for options. This quilt is backed with scattered fire trucks - and it would have been both fun, and probably a lot easier to meander around the quilt outlining the trucks and rescue vehicles. I will remember this for future projects.


The quilt is trimmed and the binding machine stitched to the front. The quilt is now "portable" and suitable for stitching while waiting for hockey practice to finish.  And it WILL be ready for my nephew's birthday in a few weeks.

As I stitch the binding on, I'm finding that I must have been slightly off center of my machine when I applied the binding. I mismeasured and cut the binding strips 2 inches instead of 2 1/4 inches, so the binding is applied a scant quarter inch from the edge. At one end, there is almost a perfect balance of filled binding and even on each side.  However, towards the middle, there is much more of the binding on the back of the quilt than the front.  So far, I am not having a problem covering the seam from where it was sewed on the front.