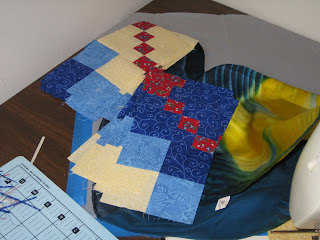
I've finally settled on the color combination I want to use with this wonderful fabric! When I saw the fabric, a quilt called out to me, but I didn't want to wait for it to be released, though it would have been perfect in one of the early projects. I am looking forward to getting started on the Interlacing Circles project.
Somewhere between hockey and hockey, I hope to sew. Otherwise the fabric will take over our house soon... It appears to be multiplying... But I do have projects planned for most of it.
Friday, February 25, 2011
Monday, February 21, 2011
Building the Asian Nights ....
This evening, I laid out the Asian Nights blocks.
I started with the center 16 - Town Square layout. Then headed down the hallway to get Mike's opinion on which color scheme resonated best.
I like both - though we ended up agreeing with the second version with the blue center.
Then, the fun started as I continued to lay out the additional blocks to add the columns on each side and the additional rows on the top and the bottom.
There was a brief moment of insanity last night, when I thought about creating enough additional blocks to make it into an 8 x 8 square... I quickly talked myself out of that.
Once all 48 blocks were on the flannel, I started playing again...
I tried a few more variations - but this is the one that Mike and I decided upon in the end.
I now have three of four "super rows" completed - following the QA directions to first sew giant four patch blocks - and then joining three giant blocks in each row. I'm looking forward to completing the last set and joining all four together later this week.
I started with the center 16 - Town Square layout. Then headed down the hallway to get Mike's opinion on which color scheme resonated best.
I like both - though we ended up agreeing with the second version with the blue center.
Then, the fun started as I continued to lay out the additional blocks to add the columns on each side and the additional rows on the top and the bottom.
There was a brief moment of insanity last night, when I thought about creating enough additional blocks to make it into an 8 x 8 square... I quickly talked myself out of that.
Once all 48 blocks were on the flannel, I started playing again...
Original Asian Nights Layout |
Squares in squares- I like this one, but the colors were a bit wonky - I think if I'd had more yellow blocks it might have worked |
The winning center. |
I now have three of four "super rows" completed - following the QA directions to first sew giant four patch blocks - and then joining three giant blocks in each row. I'm looking forward to completing the last set and joining all four together later this week.
Saturday, February 19, 2011
My Friday Night "Press" In...
48 completed blocks ready to be squared |
So how did the evening go?
Started by pressing the 24 remaining half blocks and trimming the side that would be sewn together. Then sewed them into the final 12 blocks and back to the ironing board. First to press the most recently completed blocks - then to repress on of the seams as I forgot to fan the center seam. I have two spray bottles keeping me company - the Niagra bottle has plain water so that I can steam seams or dampen the fabric in order to re-set a seam or two (or 42). The other bottle is Mary Jane's Best Press, unscented, so that I could starch the blocks once again.
Sadly, I only got to sew 13 seams tonight (had to redo one of the blocks). After pressing and re-pressing, I had the pleasure of squaring 48 blocks. And by the time I finished that seemingly endless task - though I did notice that it got easier as I reached the more recently pieced blocks as I had done a better job of piecing them, it was still incredibly tedious. BUT it is done. And hopefully this weekend I'll have time between scouts and hockey to decide which layout I like best and assemble the top.
I did take a lesson from the Dr. Seuss Log Cabin - when I squared each of the blocks, I aligned the ruler based upon the center seams rather than lining up one of the corners. When I stitch the quilt together I'll use the central seams again in order to align the points, in hopes of keeping the quilt even in the end.
The Corgis took advantage of the quiet evening and kept me company by sleeping, thankfully not on top of any of my fabric.
All in all, it was a successful evening.
Friday, February 18, 2011
Friday Night Sew-In tonight...
Thanks to a timely reminder from Rocknquilts - I am going to try once again to participate. Never mind that I have the date prominently posted on the button on my blog.... I'm just not good with calendars and dates tend to fly past me.
I hope to finish Asian Nights tonight. Last night was a bit of a wash as I curled up with Gus and the Corgis for a nap, and slept until about 2:00 a.m. ...
Thursday, February 17, 2011
The end is in sight - 36 down, 12 to go...
The end is near! Asian Nights is close to being complete. Over two nights, I've reduced the number of individual blocks to the point where I hope to complete the final 12 tonight - so that I can decide on the final layout of the forty eight that make up this quilt. 48 blocks created from 1,344 patches - which means multiple trips back to the cutting mat and the ironing board.
Tuesday night -
60 units pressed
84 units trimmed to square the corners
4 episodes of Big Bang Theory play in the background (possibly more)
Wednesday night -
24 half blocks sewn together to create 12 finished, none ripped out to be restitched!
48 diagonal half blocks converted to 24 diagonal four patches!
36 new units pressed.
24 diagonal four patches combined with 24 four patch blocks to create 24 more half blocks, waiting to be pressed and finished.
3 more episodes of the Big Bang Theory play in the background...
So, what have I learned from this project?
1. When changing fabrics from those pictured in the instructions, it makes good sense to write down the color that you plan to use in its place. I think this would have solved most of my pressing issues in combining the four patch blocks.
2. Nesting the seams really does help to achieve a perfect meeting in the center of a block, so making a practice block before jumping into cutting and pressing all of the components can help.
3. Measure thrice, cut once.
4. If you don't absolutely love this project, stay with the Town Square size. It is a great teaching quilt, especially for developing precision in cutting and piecing, but it can also get quite tedious after awhile. I am very happy to be seeing the light at the end of the tunnel.
Sunday, February 6, 2011
Week Four: Bindings - Feeling Empowered!
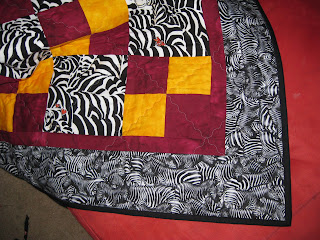
The last week of class was devoted to bindings. At the end of week three, Gus and I decided that a solid black would be best with the zebras and the lions. The goal is a neatly applied French Fold or double binding. The double layer adds some strength to the border. We did a straight cut rather than bias cut as there are no curves in the class quilt. And while the bias cut bindings does add additional strength, it also introduces a degree of stretchiness.
After pressing the fabric, I cut five 2.5 inch strips and pressed and starched them. The next step was to join them at 45 degree angles to create one long strip. The diagonal join reduces the bulk at the seams which does indeed make a difference when stitching onto the quilt. The creation of the binding was actually much easier that I thought it would be. I did mark the fabric with pins so that I would not end up with different shades of black from sewing the fronts and backs at random.
After pressing the binding the next step was to stitch the binding to the front of the quilt, lining the raw edges of the binding up with the edge of the quilt. And then the fun began. I started stitching the binding to the back of the quilt with what turns out to be a very thick needle. The instructor suggested I try straw needles instead, and another quilter suggested size 11 sharps - so I now have both in my stash. I also added a needle threader to my gadget collection... something I never thought I'd do. However, with this size needle, I met my match and decided I'd rather spend my time stitching than attempting to thread a needle. The first side of the quilt, I started to get cramps in my hand holding the folded over binding so that it would cover the seam from the front. After I started pinning sections of the binding, using the pinmoors to keep from stabbing myself, it was much easier and less tension in my hand to get the binding attached. I have successfully stitched about 80% of the binding on now, part in class, part at hockey practice, and part at the games today. I should be able to finish on Tuesday night at practice.
I am happy to say that I'm no longer scared to sandwich and bind a quilt. Taking the class and working with the instructor and other students definitely helped me to get over my worries which was my biggest goal. Plus I have a cute quilt finished to boot.
Tuesday, February 1, 2011
Moving Right Along...
Week three featured sandwiching and quilting. Unfortunately, Gus took a header into the boards on Sunday, so before class even started, I had to head to school to collect him. Gus quietly did his homework and then entertained the folks at Thimble Pleasures while I worked.
Our teacher paired us up to pin, and my table partner was able to quickly help me pin everything together. I am using Pinmoors to pin instead of safety pins and I like them a lot. But then, I've rarely met a gadget I didn't like.
Before we started quilting our projects, we practiced on a sandwich made from the batting and backing we trimmed off the quilt. I intentionally overexposed the picture so that the various stitch lines might show up. The first task was to check to make sure our tension was set correctly to accommodate the extra thickness of the batting. Definitely easier to test when you use different color threads on each size, which I didn't. However, with only a minor adjustment to stitch length, I found the tension to be appropriate. Next was setting the width of the curve for the wiggle that I decided to use. It was suggested that the wiggle is more forgiving than a straight stitch, however, me trying to line things up without drawing lines on the quilt, resulted in many missed intersections as I think I kept my eye on the needle more than the foot. Once we reached a comfort level with the sandwich, we moved on to the quilt.
The first four seams were on the long diagonals - first across the four patches and then across the large patches. Above, on the left is the first seam. My goal was the wiggle in the garnet square, however, I learned that maneuvering the quilt versus maneuvering the test sandwich resulted in different "wiggles" - as can be seen at the upper right and lower left. The boarders were included in the long seams (and all of the other seams) so that we didn't have to come up with a separate design for the border. While that worked for this first project, I probably will do it differently as I work through the Quilter's Academy projects.
At one intersection, in both diagonals, the walking foot apparently hung up on a seam bump and my inexperience with maneuvering the quilt through my machine resulted in an interesting pattern (photo overexposed to show the hiccups).
Due to leaving class to collect Gus, I didn't get as much done in class as I would have liked. However, my partner did help me select fabric for the borders. We auditioned several patterned fabrics and decided that with the heavy concentration of zebras in the borders that solid black is really the way to go.
However, not finishing the quilting in class forced me to evaluate my home setup and CLEAN off my sewing desk somewhat so that I didn't end up knocking anything off. I do like quilting at the house versus in class better as at home, my machine is set into the table and maneuvering is easier without the added height.
One of the fabrics I auditioned a week earlier for the backing is a smaller zebra print in the same collection as the zebras in the large patches. Our assessment was "a whole lotta zebras." So I went with predators for the backing. Now, had I chosen the backing earlier, I might have chosen a less intense gold for the four patches on the front. But overall, I'm quite happy with the results.
Our teacher paired us up to pin, and my table partner was able to quickly help me pin everything together. I am using Pinmoors to pin instead of safety pins and I like them a lot. But then, I've rarely met a gadget I didn't like.
Before we started quilting our projects, we practiced on a sandwich made from the batting and backing we trimmed off the quilt. I intentionally overexposed the picture so that the various stitch lines might show up. The first task was to check to make sure our tension was set correctly to accommodate the extra thickness of the batting. Definitely easier to test when you use different color threads on each size, which I didn't. However, with only a minor adjustment to stitch length, I found the tension to be appropriate. Next was setting the width of the curve for the wiggle that I decided to use. It was suggested that the wiggle is more forgiving than a straight stitch, however, me trying to line things up without drawing lines on the quilt, resulted in many missed intersections as I think I kept my eye on the needle more than the foot. Once we reached a comfort level with the sandwich, we moved on to the quilt.
Another example of the inconsistency |
Walking foot got hung up. |
Due to leaving class to collect Gus, I didn't get as much done in class as I would have liked. However, my partner did help me select fabric for the borders. We auditioned several patterned fabrics and decided that with the heavy concentration of zebras in the borders that solid black is really the way to go.
However, not finishing the quilting in class forced me to evaluate my home setup and CLEAN off my sewing desk somewhat so that I didn't end up knocking anything off. I do like quilting at the house versus in class better as at home, my machine is set into the table and maneuvering is easier without the added height.
One of the fabrics I auditioned a week earlier for the backing is a smaller zebra print in the same collection as the zebras in the large patches. Our assessment was "a whole lotta zebras." So I went with predators for the backing. Now, had I chosen the backing earlier, I might have chosen a less intense gold for the four patches on the front. But overall, I'm quite happy with the results.
Trimmed and squared and ready for binding |
The final binding fabric - solid black works nicely with both patterns. |
Subscribe to:
Posts (Atom)