 The first step in a new project for me is to choose the fabrics. Back in January, I picked up the border stripe and accompanying scatter fabric for the table runner. I thought I had also purchased the large sunflower print, but it is nowhere to be found in my stash (until the dash of course). I spent an hour or so digging through buckets to find the accompanying fabrics and checking them under the ott lite.
But fabric choice is only one aspect of preparation. Over the course of finishing Carolina Rain for the swap, my iron ended up pretty gunked up.
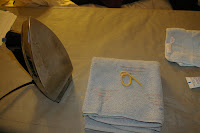
So I pulled out a hand towel and squeezed out some Dritz hot iron cleaner. The directions on the tube state to rub the hot iron (set to cotton) on the folded rag in a circular motion.
A few moments later, with the accompanying smoke, the surface of my iron is nice and shiny again, and I don't have to worry about transferring any scorched starch onto fabrics for the upcoming project.
As you can see, the towel now has the dirt. And that will wash out.
This is a dry iron, from Vermont Country Store. I like it because it does not have the steam holes, so nothing to catch the fabric in when pressing, and much easier to maintain. I keep a spray bottle of water near by to spritz in case I feel the need to steam a seam. This works well for me, as I also don't have to worry about steam burns while using the iron. And I no longer have the problem of an iron spitting hot water at me.
The next step in the preparation was to check my seam allowance. I recently purchased a Bernina 830 to keep my Bernina 801 company. I really like these old Berninas. I used the Perkins Perfect Piecing Seam Guide to set my seam guides. And looking at the picture now, I see where my problem arose last night - the tape, which I though was perfectly set, is in actuality angled just enough to skew the seam allowance.
To test the seam allowance, take three short strips that are 1.5 inches wide. Sew them together, and after pressing the strips, you should be able to measure a perfect one inch on the middle strip. I thought my problem last night was that the center strip was a few threads wider than 1.5 inches. And now, I think that the tape placement also put the seams a few threads off as well. The solution is to use a shorter stack of tape, which will then be less likely to drift off line.


1 comment:
oh lovely colours - looking forward to watching your progress
Post a Comment