Saturday, January 16, 2021

RSC 21 - Think Pink Take 2


This week was spent working on my Table Scraps project - Woven Hearts Table Topper which will be revealed in full in a few weeks. I found a tool in my stash that I previously thought of as a bone folder in paper crafting, but works quite well as a Hera marking tool. I may have a new favorite tool for marking.

I spent quite a bit of time getting reacquainted with Molly, my Sweet Sixteen. And I actually quilted something for the first time is way too long. 

And then I relearned how to attach binding. Over the next week, I'll spend some time hand stitching and playing with pink fabrics.

RSC21 - Pink Link UP

Tuesday, January 12, 2021

Attempting a PhD in quilting.

Projects Half Done? Yes, I have them. I have rather a collection of them. They range from being partially pieced to being oh so close (for several years now). I am inspired by  the PhD in 2021 Challenge offered by Quilting Gail.

I have selected 12 unfinished objects, many of which were blogged when I was last active over 7 years ago, if that gives you a sense of my backlog. I am not ranking the order for completion as I'm sure it will vary over time. And I'll be happy to complete even one as that will beat last year's total of 0 by a mile. 

Quilting will take place on Molly - my Sweet Sixteen. I've identified my three biggest roadblocks to getting quilts done. 

  1. Borders. I find borders tedious. I am easily drawn to exciting new projects and don't stop to take the time to finish the important final step.
  2. Planning the quilting design. I have a massive case of quilter's block when it comes to planning a design. So many possibilities. I lean towards custom quilting - though I have done some in the past with very simple designs and I am not opposed to do that again.
  3. Fear of my machine - or of not being perfect. I am pushing myself to practice and become more comfortable with my machine. 

1. Marvel Lap Quilt


Started in 2017, partially completed in 2019, this one has jumped to the forefront as I decided that adding borders to this cutie will be my One Monthly Goal for January. This was a pre-cut quilt, as in all the pieces were pre-cut. This one will stay here as we are all Marvel fans. It needs borders, to be quilted and bound.

2. Coastal Pearls Picnic Quilt

This is the last quilt I blogged about, back in June 2013 and July 2013. This was started as the String of Pearls Quilt-Along led by Christa Quilts (2013). I did finish assembling this in 2013 and even sandwiched it. This is one that has been suffering Quilter's Block - instead periodically serving as a seat cushion while waiting not so patiently to be quilted.  I glue basted this one, so I haven't had to worry about sitting on pins. The backing for this quilt is a coverlet I found when we were clearing my grandmother's house back in 2013. This quilt will go to my youngest sister who has a love of beaches and flip flops. It needs to be quilted and bound.

3. Seminole Mountain

Started in 2014 at a Bonnie Hunter workshop sponsored by the Durham-Orange Quilt guild. The pattern is Smith Mountain Morning. The colors are those of my alma mater - and my go-to color palette. This quilt will stay with me and will eventually have its own retrospective blog post. It needs borders, to be quilted, and to be bound.

4. Sandy Breeze

This one is a bit embarrassing. It is a donation quilt - that has been sitting basted and waiting to to go under the needle for quite a few years now. I blogged about it several times in March-April 2013. It sticks me with pins periodically as I move it around. I am determined to get this one done and turned in to the guild this year. This one has suffered from quilter's block and perfectionism. I just need to get it done.

5. Gus's Camo Quilt

The least finished of the projects on my list. I picked out fabrics and started cutting in September 2019 at the Lake House retreat. The pattern is Pecking Order, a sweet pattern many in my bee have completed recently. My son has been asking for a Camouflage quilt for his room and gave me creative license to choose the pattern and the fabrics. Now that we are no longer doing travel sports, I don't get to drag him into local quilt or local yarn stores anymore and he doesn't go with me voluntarily to select fabric. I have decided to use these blocks as the leaders/enders for other projects and suddenly am making forward progress getting them assembled. The quilt will go to Gus, and it needs pretty much everything done for it.

6. Dogwood Runner

In June 2013 I took a class from Annette Ornelas - Southwind Designs - Carolina Dogwoods. This project is the closest to being finished as it just needs quilting in the borders and to be bound (original blog post). I have picked a motif for the borders and we are back to 'fear of my machine' that was the primary delay. Another quilt that sticks me with its pins each time I move it around. This will go to my mother once it is complete.

7. Penguin Patch

An oldie but a goodie - top was finished, sans borders, in May 2011. This is one of the Quilter's Academy lesson quilts. Another in need of borders, quilting and binding. I'm not sure where this one will end up.

8. Celestial Circles


Another lesson quilt from Quilter's Academy. This one was presented as a Table Topper, but as I loved the design, I went big - like really big. This quilt needs borders, quilting, and binding. It will go to my sister when it is eventually completed. Numerous blog posts: March 2011March 2011April 2011.

9. Asian Nights


Another Quilter's Academy lesson project from 2011 which needs borders, quilting and binding. I don't know where this one will eventually live, and I'm not certain I set aside fabric for the backing and binding for this one as I did with several others. Could be an adventure. As it was a learning quilt, there are several process posts from 2011:  Building February 2011Pressing February 2011Construction February 2011

10. Dr. Seuss Log Cabin


This is one of my favorite lingering projects. It is a Quilter's Academy lesson and was blogged about back in November 2010; Blocks. My original intention was that it go to my nephew... and he outgrew it, so I thought maybe I'll finish it in time for his younger brother to enjoy... and he outgrew it. So I'm hanging onto this one for a future grandchild. It has been sitting here for 10 years, what's a few more at this point. It needs borders (I'm thinking more red dots), quilting, and binding. I do have a black and white Dr. Seuss for the backing set aside.

11. Daisy Wonderland


This is the first of the class quilts in Quilter's Academy - started back in August 2010. It still needs borders, quilting and binding. And it needs a home. This one is lap sized. 

12. Triple Rail


Another early Quilter's Academy class quilt. Blogged about numerous times in September and October 2010. I've always liked the simplicity of this quilt. But is also says to me "I am a background for something more." It needs the obvious borders, quilting, and binding. But first, I think it needs a couple giant applique flowers. I have an idea of who this will live with in the future.

Happy Quilting!


Sunday, January 10, 2021

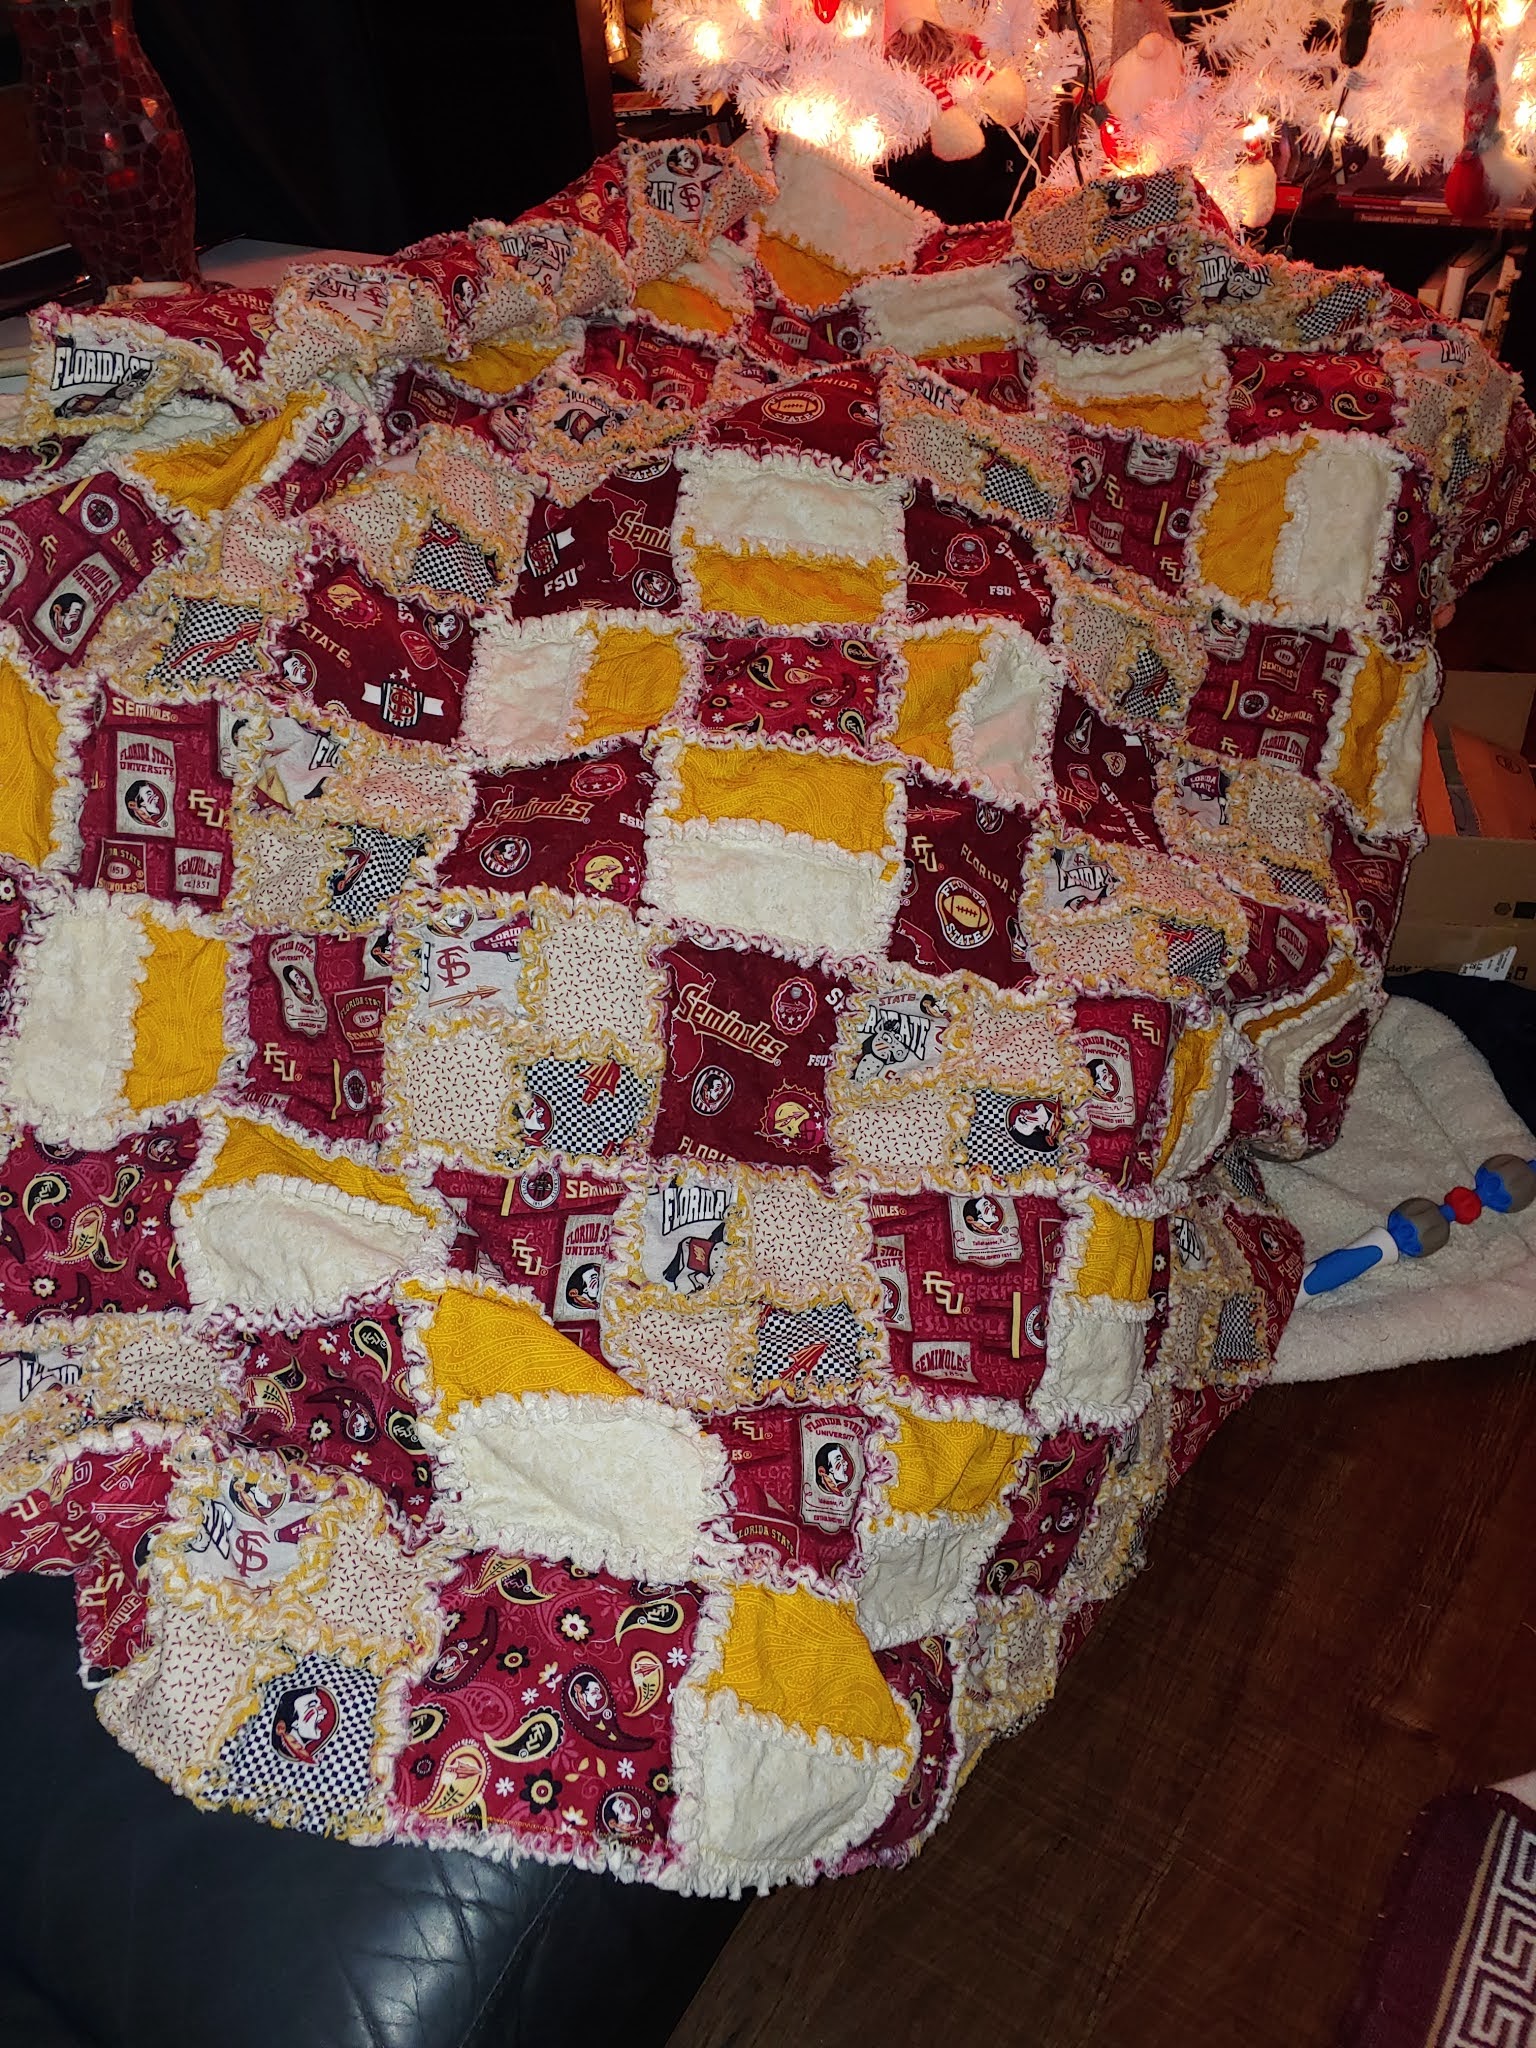
Seminole Rag Quilt - Take 2

 Just over 10 years ago, I gifted a quilt to my nephew. The Project That Started This All.  While rearranging and resorting and rearranging again my quilting tools, I ran across the Fiskars Rag Quilt Snips in a drawer. And got to thinking. I really liked the way that quilt turned out. Why not make one for myself. I was looking for a project to keep me busy during my staycation and this was the perfect project - Started December 26, 2020 - finished January 5, 2021.

There is a plethora of new licensed fabric for FSU (as well as for many other schools and sports teams), and I started collecting. I have a bad habit of collecting more than I use... I think I ended up with 9 different FSU fabrics in my stash, and there may be scraps of the original two still hanging out - neither of which appear to be available on eBay or Etsy (definitely not from the retailers). 


Lots of fun new fabrics to play with. Because I was collecting without a pattern or goal in mind, I generally purchased a yard of each - not enough to do the full quilt with just one garnet fabric - so I used 4 different ones in the layout along with two grays. Originally the red on the top right was going to be the backing, but I decided against cutting up a backing that could be used for a queen sized quilt. Switching gears, I decided to use the dotted neutral. There wasn't enough of that to do the entire back, so I ended up using some of the FSU fabrics on the back as well. This led to lots of hand written diagrams and notes so that everything would end up in the right place.


I started pressing and cutting on December 26th. I quickly fell in love with my new Creative Grids Stripology Ruler. Why did I wait so long to buy one? It is amazing. And is my new favorite tool. I cut strips of each fabric and before cross-cutting into squares layered the backing, flannel and top fabrics together. This saved me needing to stack each square individually.


And as I cut, learned that I still didn't have enough of the dotted fabric to do what I wanted on the front and the back, so subbed in a neutral for the front, and decided that the chosen yellow was competing too much, so auditioned a new one (the one on the left was the winner).


Eventually, I ended up with 17 sets of cut blocks. Some of those piles were used to create the four patch blocks and the two-rectangle square blocks. So now I had thirteen different combinations. I divided the rectangle blocks into four equal sets as I needed 7 facing in each direction... but I won't bore you with the numbers. Suffice it to say, my cutting table was full of blocks with coded bits of paper that matched up to my master diagram. 


I then meticulously stacked everything by row - pinning the row number to the first block of each row and leaving a loose one number on each stack so that I didn't lose track of which one to add next.


Rows were built  a few at a time a few blocks at a time, starting on December 29th. 


Until I had the weight of all 11 ready to combine. Then the real fun began. I've decided I much prefer Wonder Clips to pins for keeping my rows together. So the routine was to pin sets of rows together, sew, combine sets, repeat. The weight of the flannel made maneuvering the rows after the first two were joined a little challenging.  I no longer use the sewing desk for piecing as that is where my "home office" is based. So I'm using a portable sewing table that I got from Craigslist as part of my purchase of Bernadette. For years that table was stored behind my fabric cabinet, and now it has a starring role in my sewing space. It also does not have a lot of space to the left of the needle, providing lots of opportunity for drag and catching on things - I'm still trying to maneuver existing furniture around to solve that hiccup. But I digress.  Because this is a rag quilt, I did not fret about uneven seams the way I would in a standard quilt - it gives it character (that is my story and I'm sticking with it).

Finally complete, and I snapped a picture to share with a friend. And then noticed the bottom right rectangle. Out of 121 one blocks, one was turned wrong. I knew it would annoy me, so out came the seam ripper and back to the sewing machine. Fortunately it was on the last row (nearly the last block) and an easy fix.


I started clipping seams on New Year's Eve - and finished snipping on January 4th. Snipping may have taken as long as the sewing did. I now see why some people prefer the Accuquilt Rag Quilt die which pre-fringes blocks for you. One blister later (and an excellent excuse to get out of washing dishes) I was done.
 
Now for the washing. In the absence of COVID-19, I would have gone to the laundromat to mitigate the lint in my pipes and machines. However, that is not an option for me this year. So off we went to the laundry room. Three times through the washer and dryer with various jeans and towels to keep it company. I have a front loader that does not like it when I try to wash only one quilt or one blanket. 


The lint accumulation from three times through the washer and dryer was impressive, that is a standard dryer ball to the right for scale. I could have quit washing after after 2 cycles as there wasn't too much of a change in the ragging, but there was still a substantial amount of lint in the trap after three, so I'm glad I persevered. There are thread scraps throughout the house and I anticipate we will be shedding thread for days, weeks, months... 

I'm very pleased with the end result. This will be a nice addition to our living room.

The technical details:
  • The first quilt has finished blocks of 7 inches. A decidedly weird measurement considering the rail fence blocks. Because the fabric standard width is trending downwards, I decided on 6 inch finished blocks in hopes of cutting 6 7 inch squares from each width of fabric. That worked great, with the exception of one print and the cream flannel which was barely 42 inches wide - so there are selvedges included in some of the snipped areas. There is no batting in this quilt.
  • The blocks are roughly 6 inches finished, cut 7 inches for the solid blocks and 4 inches for the strips used for the four patches and the two-rectangles. 
  • There is no quilting in the individual blocks because I used a block that was small enough for me to be comfortable not quilting it.
  • Three layers - cotton fabrics on the outside, flannel on the inside
  • 11 rows by 11 columns for 121 blocks. 61 squares, 32 two-rectangle blocks, and 28 four patch blocks.
  • Layout is a trip around the world setting.
  • Finished size planned at roughly 66 x 66, but is more like 60 x 60 after taking some extra wide seams along the way and a bit of shrinkage. Still the perfect size for snuggling up.
  • Tools from start to finish to transform 11 random fabrics into one wonderful quilt: Excel, Pencil, Paper Scraps, Stayflo Starch, Dry Iron, Wool Pressing Mat, Water Bottle, Gingher Rotary Trimmer, Creative Grids Stripology Ruler, Creative Grids 12 x 2.5 inch Ruler, Wonder Clips, Pins, Bernina 830 Record, So Fine 50/3 thread, Gold Thread, Fiskars Rag Quilt Snips, Netflix.

Saturday, January 9, 2021

Rainbow Scrap Challenge - Think Pink!


For the RSC21, I have decided to create blocks that can be used in a sampler quilt in the future. I recently found my copy of Tula Pink's City Sampler - 100 Modern Quilt Blocks and decided to use this as my focus. I have had it on my shelf for quite a few years, but previously only glanced at it. I really like the way each block is presented. Perhaps it is the IKEA style of directions - few words on a given page.  For those not familiar, the blocks are divided into 6 categories. In order not to get frozen by selecting the perfect blocks each month, I turned to a random number generator and asked it to spit out 10 numbers. I used the first four numbers on the list (see results below) that fell into four different chapters. I anticipate as the year goes on having to generate increasing more numbers each month to avoid duplicate blocks.

Currently my scraps are rather large - as in full cuts of fabric. The past few years have not been kind to my quilting space or time and I've done more collecting of fabric than cutting of fabric. Concurrent with the Rainbow Scrap Challenge, I'm participating in the Joyful Quilter's Table Scraps Challenge. So, to stay in the spirit of this challenge - blocks made for RSC21 will start with scraps from the monthly Table Scraps project if I don't already have scraps in the monthly color.  I will also try to work from the oldest bits of my stash before moving on to newer acquisitions. Above all, I will strive to have fun! My first step was to pull the pink from my stash to see what I actually have to work with. Most of these ended up back on the shelves. Originally I planned to go heavy on the flamingos, but the patterns I'm using thought differently.


Paydirt! I decided I wanted to use woven hearts for the table topper. My mother is Danish and woven hearts were a featured decoration at home. As I rifled through my stacks I found a pink that I dyed during a quilt bee meeting and never used, a roll of hand dyes that I have no idea where they came from in varying pinks and reds, and several fabrics that my father picked out while vacationing in Portugal. These fabrics are featured in three of the four RSC blocks that I have completed.

THE CHOSEN BLOCKS


I'm using the backside of the fabric I dyed myself as I'm wasn't wild about the contrast on the front. I prefer the subtle texture the back gives. That fabric appears in blocks 7, 50, and 98. Block 50 features all of the Table Scraps fabrics - and that is a block I swapped out when I decided to use bonus triangles created as a result (the random generator gave me block 49). Block 71 is the only one that sent me into my uncut stash this month. The scrap I found to use for the block 98 feature fabric includes both large and small elements, freeing me of the need to find a third fabric. 

I finished these more quickly than I expected, so I may add a few more later this month.


It will be fun to see what I have to play with at the end of the year.

Linking up to So Scrappy

Thursday, January 7, 2021

Link Up to January 2021- One Monthly Goal


My opening "One Monthly Goal" is to add the borders to the Marvel Lap quilt.  I bought this project at the North Carolina Quilt Symposium - I think in 2017 when Durham Orange Quilters hosted, but not positive anymore. This featured all pre-cuts with all fabric except that for the backing. It will be lap quilt sized. It was packaged in a nifty lunchbox.

 I started working on it in 2017 but got stymied by a malfunctioning Featherweight and put it away for a few months then started again at home.


During one of our Nimble Thimbles Sewing Days at the SECU Family house in 2018 I finally started assembling rows. Photo Credit to "The Joyful Quilter." I ended the day needing to attach the final partial rows on the top and bottom. And promptly stored the project. I pulled it out on New Years Day and assembled the two partial rows which are now clipped top and bottom to be sewn on. I measured the quilt before realizing I was missing the two rows, and it was very close to being square (well rectangle) - like within a quarter inch. BUT it is also about an inch longer than it is supposed to be... so I'm hoping I have enough of the border fabric. Because I either lost a piece or there was a piece missing from the kit, I had to sub in a red, so I have some of the red available in short bits. I have enough of the correct black just in case - or I could place cornerstones if necessary using my backing fabric. I found a very similar print a few years ago on Michaels.com which I'll use for the backing.


Adding borders is one of those tasks that make me crazy, and I have a stack of WIPS waiting for their borders. So, My goal this month is to add the borders to this quilt!

You too can join the fun here: One Monthly Goal - January Link-Up


Wednesday, January 6, 2021

Setting Goals for the Year


On Saturday, January 2nd, my Quilt Bee, the Nimble Thimbles, met on Zoom for the day. It was an energizing day for me, and inspiring.  As we chatted, friends discussed challenges they enjoy and have created. So there are four which I plan to participate in this year in hopes of building momentum and actually finishing some long lingering projects.

The four challenges I am taking on are:

The Joyful Quilter - 2021 Table Scraps Challenge


SoScrappy - Rainbow Scrap Challenge 2021


Quilting Gail - PhD in 2021 Challenge


Elm Street Quilts - One Monthly Goal


I expect that these will overlap somewhat due to the nature of the challenges, but I don't plan to count the same item four times either. This will also compel me to blog more, as each of these projects require their own posts - so double bonus.