Thursday, August 26, 2010

Finishing the Dragon Quilt

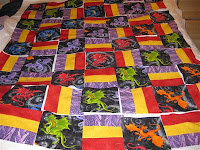
The Gus approved layout
A few days later, I unrolled my design wall, and let Gus look over the dragon pattern. He approved so I started stacking squares.

Partway - with my reverse order squares
before figuring out I was pressing
everything in the same direction
My intent was to sew the rows first so that when it came time to sew the rows together they would be shorter (7 squares wide versus 9).  However....  my logical mind failed me.  I now know that I needed to have 9 piles not 7. Rather than lay everthing back out, I decided to suffer through the longer columns. So - I chain stitched the first pair of columns.  Then, when it came time to add the next column, I realized that I was going to end up with a lot of quilt to the right of the needle - and since there is a distinct pattern to the dragon arrangement this could be a problem.  Ever resourceful, I simply turned my tray of squares upside down and chained 7, 6, 5, 4, 3, 2, 1 instead of 1, 2, 3, 4, 5, 6, 7.  It worked.

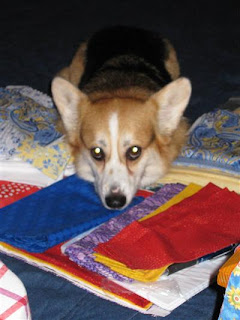
Monkey found a new way to
be helpful.  I think I like it better
when she just rests her head on
the cut fabric...
Over a period of two evenings, I chain stitched the columns and sewed the first three together. Two thirds of the way through the columns, I realized that I had been pressing all the seams in the same direction - which would create problems in the joining step - so I had to go back and redo the block pressing. Glad I figured it out then, instead of when I reached the step. Because some of the dragons were bias cut, I had to be very careful while stitching and pressing to not pull them off square.  A gentle touch can be a very good thing.


On Sunday Gus decided it was time for him to learn to sew - so together we made him a tuck-away tote bag. Several months ago he picked out a rose/skull fabric with a red contrast fabric. Later I found a FQ of white skulls on black.  Thinking I'd be able to use my old machine, and so that I didn't have to rethread my Bernina and wind another bobbin, I got him set up.  And I confirmed my wisdom in purchasing the Bernina. Both Gus and I fought the feed dogs on the Singer to sew a straight stitch.  For the strap, I set up parallel tape guides which did help as that was a 120+ inch seam.  We took turns, and there are several "imperfect" seams - but overall both Gus and I are pleased.  I learned how to sew French Seams and really like the effect as these are unlined bags.  He did protest me ripping out a few of his seams for him to redo - but not too loudly.  On Tuesday, we went back to Thimble Pleasures so we could purchase the next set of fabrics - and webbing for the handle (my forefinger and thumb are still tingly and painful from turning a 120+ inch tube with a pair of tweezers - before I do one of those again, I'll get a tube turner - probably would have taken much less time too).  This weekend, I'll let Gus use the Bernina.  And I'll also keep an eye out for good sales on fabrics to make gifts that won't break the bank account.

Dash has decided he will get
more attention if he sleeps on or
at least in front of the pedal.  He was
showing a great deal of interest in the
area near my fabric stash, and I was
worried there might be a mouse. Nope
just a stray grape (thanks Gus).
Fortunately I found it before Dash.
So back to the quilt. Tuesday night, I completed the top and then starched it a few times prior to storing until I reach the borders & bindings lessons.  Gus is very happy.

I did notice something in the pictures, which I downloaded AFTER all of the columns were pieced. If you look carefully at the red dragons, there are several that have great swirls behind them. Unfortunately, I didn't space them apart, so they are a bit clustered together.  The contrast didn't show up in the room lighting. Oh well. Now I know to check the pictures during the process.

Wednesday, August 25, 2010

The Dragon Quilt - Part 1

Compared to some of the help I've received
this is looking good...

As as aside, I'm not sure why I stress about having everything ready and all the pictures uploaded before I start writing a post.

Over the past two weeks, I've been hard at work on the second quilt top - the Dragons - which is based on Carrie's Cowboy Corral.  In an earlier post, I described the process of selecting fabric for the rails to go along with these wonderful dragons. The dragons take up roughly 6 to 7 inches of space depending on how you frame them.  I decided to reduce the quilt to 7 blocks by 9 blocks as compared to the original 9 by 11 in Carrie's as the quilt would be proportionally larger - and I'm not confident in my ability to quilt something too large just yet.

I sewed the strips for the rails in one evening, and spent two more leisurely cutting the blocks. I did take the time to ensure that the blocks were properly squared this time, so there would be less lopsidedness. For the last three blocks, one side was mysteriously narrow - so I stuck a pin in the narrow strip to remind myself to adjust the seam allowance and that worked.

It did take me some time to get started on the dragons, as I fretted some about fussy cutting the dragons.To add to this, I only had two yards of the dragon fabric, and Thimble Pleasures sold out - though it is still available online.  As it turns out, 2 yards yielded exactly 32 usable dragons.  It might have yielded more if I'd been a little more methodical in the cutting, rather than trying to get certain colors first, and I was very worried that I'd be short a dragon or two as I already knew the fabric was gone.

The end result was 8 green, 7 purple, 7 red, 6 blue and 4 orange dragons.  I have now made a strong note to myself to never again use 5 colors when the yield is not divisible by 5.  I suppose I could have skipped using the orange ones (as I detest the color orange), and tried to cut 8 of the other four colors - but the orange dragon is cool - and adds a bit of brightness.

Once everything was cut, the next challenge was to lay it out and decide on the color pattern.  I used the 2 yard flannel backed vinyl that I got a JoAnne's recently - and laid it on the bed. I'm looking forward to having the wall space to hang it as the bed has the hazard of plucking Corgis off of it and involves too much stretching and bending.

My initial goal was to create a random scattering of the dragons with a few simple rules:  1. Orange cannot be next to blue; 2. Orange cannot be along an outside edge because it would be next to the blue border (I'm a FSU Seminoles fan - nuff said); 3. Purple dragons should not be in the purple frames and red dragons should not be in the red frames; 4. Same color dragons should not be side by side or above/below in relation to one another and if possible also not on the diagonal. 5. Avoid too much red & purple together as the colors are of similar intensity.

So - an hour or two later, every time I thought I had the dragons organized, I would find a patch of three of one color in one of the corners - and switching dragons would just switch the cluster to a different color in a different corner.  At this point I started looking at placing the colors on the diagonals and still tried to keep the orange and blue apart...  Eventually, I settled on this one. And then called Mike in for his opinion. And yes, I did have to drop some of my restrictions on where the orange dragons could be placed.  This might have been easier in the 9 by 11 layout - or might have been even more frustrating. I ended the evening by rolling up the design wall and heading to bed.

Monday, August 9, 2010

First Quilt Top Completed

I got a chance to use my new board tonight as I finished pinning together and pressing the final rows of the quilt.  When the time comes to add the borders, I'll use the red as the first border and then the blue flowers as the wide border. I think I'd like to bind it in the red, but I'm not sure that I have enough of the fabric.

Productively mixed weekend.

By Thursday night, I had all 11 sets of blocks sewn together into strips.  I found that I could neatly stack them by accordion folding as they were mostly attached due to the chain piecing.  There were a few times along the way that I ripped out a seam and redid it as I didn't feel like it was lined up well enough. And as I work through sewing the rows together, I realize that there are several other spots that would have benefited from that level of critical attention - and also from SQUARING the blocks. A step I skipped because I didn't want to hassle with the ruler. A step I WON'T skip again.

Friday we took Gus to see The A-Team, which for those of us who grew up watching 80s TV it was a fun blast of nostalgia - HEAVY on the BLASTING.  Gus loved it, and having never seen the TV show had no idea why Mike and I were laughing so hard a parts. They did a really good job casting and also incorporating running gags from the show.

Dash has found a new way to be
helpful. Must watch feet carefully!
After we came home, I started to sew the rows together.  Easier said than done...  It wasn't until I started trying to pin things together that I realized how far off kilter some of the squares were. Overall I'm happy enough with this to go on so I won't rip all of the seams out and re-square the blocks.  I will chalk this up as a lesson learned. At this point, I have six of the rows sewn together and the seventh is pinned on waiting to be stitched.  I chose to go for matching corners versus perfect 3 inch squares, so while there is a little wonkiness in some areas, more of my corners match than not.  The row I added where only the first two matched up in spite of pinning on both sides of the seam was taken back off and started over. I started to think about how to quilt this when it is done, and have thought about the idea of tying and using buttons, especially in the yellow squares for added color. However, with 49 yellow squares, that could end up being quite an investment in buttons so I'm putting that idea on the back burner for now.

Now for my other triumph of the weekend...

From the first time I saw a description of the "Big Board" ironing board cover, I have wanted one. But I'm frugal (okay CHEAP) and couldn't imagine paying $120 + shipping. So, after googling for directions, I set off on a shopping trip on Saturday morning. First stop was the Army Surplus store for a wool blanket. Next was JoAnn Fabrics to pick up batting (Warm & Natural was on sale), as well as flannel backed vinyl (for a portable design wall), pellon (for a project with Gus) and the "silver cloth" that is used as ironing board covering. Then on to the hardware store for plywood and 1x2s.  Screws would have been a good thing to pick up - had to get those at Walmart on Sunday.

The board before the final side rails
were added with my shoeless assistant
I had the very helpful young man at Lowes cut my plywood into three pieces - 2' x 5.5' and a 2.5' x 4' as well as cut my 1" x 2" strips down to size so that I had one less thing to worry about at home.  I then had to head over to my neighbor's house to cut 8 inches off the big board as I overshrank my wool blanket in the wash.  If I were to do this again, I would search for a thinner blanket. The one Dad has from his Army days back in the 50s is thinner and I think would work better doubled up. The one I got from Surplus Sid's was from England and already fairly thick - and after shrinking not wide enough to double up (not that the staples would have held at that point.  Using my trusty quilting rulers, I centered the ironing board on the board and drew the lines where I wanted to place the rails. I marked the boards where I wanted to drill the holes for the screws and also the rails where I would drill the starter holes.  Gus came outside with me to help drill the starter holes (which as it turns out in pine isn't strictly necessary.  After all the holes were drilled, we took turns screwing the rails onto the board - which also served to straighten the warp (I went with a 3/8" thick board so that I'd be able to lift it myself).
Back inside to staple the blanket on to the board. Gus helped me stretch the blanket over the edges. Unfortunately he wasn't strong enough (or perhaps heavy enough) to get the staples in far enough to hold the blanket on.  After the blanket, I wrapped the board in the silver cloth. One set of instructions seems to indicate that you could forgo that step and iron directly on the blanket - but this particular blanket was still shedding after two trips through the washer & dryer - so it will be forever covered.

The finished project - I am quite pleased. Mike's first question was how was I going to store this as he thought I had bolted it to the ironing board. Thankfully this is a less permanent solution and should make pressing a bit easier. I do have to set it higher than before as I need it to overlap the bed somewhat if I want to reach my sewing machine.

All in all, a very productive weekend!

Thursday, August 5, 2010

Floral version of Winter Wonderland

Last night I finished cutting the pieces for Carrie's Winter Wonderland quilt - in a floral version (I do think this would look wonderful with the Christmas themed woodsy fabrics as well, but there is a limit to the amount of fabric I can buy at one time...).

Then, remembering my gaffe of the sampler, carefully laid them following the pattern directions in the book. I think I'll use the red again for the small inner border and possibly the binding and the blue floral for the large border.

A close up of the fabrics as laid out on the bed. Something in my posture must have blocked the Corgis from hopping up on the bed. Dash settled in on the ottoman until the coast was clear. Monkey made herself scarce.

I then stacked the rows, looked at the book and realized the instructions said columns but by then I wasn't going to change my stacks. I just have to remember that I'm working vertically instead of horizontally.
I don't have a lot of room to the right of my machine, something I hope to remedy when we move the rooms around later this year. So I headed to the kitchen to get a tray, covered it with a pillow case (the tray was REALLY dusty) and pinned my number tags onto the pillowcase so that I wouldn't get my piles mixed up.  I'm using a bobbin as my marker and finding that it really makes a difference when you are using 11 piles. It seemed rather silly with the three piles for the sampler.

I lowered the ironing board to the same level as my bed and sewing desk and placed the tray to my side. I've borrowed Gus's desk chair until I decide on one of my own, and thankfully it swivels!  I was also able to do some quick pressing without getting up.

So - what did I learn last night?
  • Always, always, always check which side of the ruler you are using.  I ended up cutting one of the strips at 3 inches instead of 3.5 because I had turned the ruler around.  Fortunately I figured it out after the first cut and had torn my fabric strips wide enough to make one additional square.
  • There is a reason the Bernina manual tells you to open the little handle on the bobbin case...  I had a devil of a time getting the bobbin to thread correctly last night after breaking the thread. Turns out there is a little mechanism that holds the bobbin in place - you can't just stuff the bobbin in the slot. I took advantage of having my machine open to go ahead and clean & oil it. Unfortunately I probably spent 45 minutes trying to get the thing to work before I figured out the mechanism.
By half past midnight I had sewn the first three rows and pressed them. The pressing of row 1/row 2 was easy to manage to get the seams folded under the square because I could just flip the squares to the side I needed. One the third row was added I really slowed down on the pressing and spent some time trying to figure out how to organize the fabric to get it pressed in the right direction. I suppose I could just walk around the ironing board but my brain had already fallen asleep. Overall I pleased with the way this is coming together.  I'm not sure what I'll do with this one as the size is a bit small for my taste - I purposefully did not enlarge it because I need to figure out how to quilt with my machine in a few weeks time and don't need the extra bulk.

Tuesday, August 3, 2010

Fabric, fabric and MORE fabric!

I rarely do things by halves. Sometimes this leads to great success and other times, not so much.  And often this leads me to procrastinate because I'm worried about how much time a particular task will take.  In June, this led to me not diving in to the actual project - and instead spend extra time reading, re-reading and surfing the web.
Floral for Winter Wonderland

I live with ADD (both mine and Gus's ADHD - makes for an interesting household), and tedious tasks can drive me to distraction. Or to walk away from a project.  To get myself motivated - I started to mentally design the various projects - for instance - as soon as I saw the Nature's Notebook line of fabrics, I knew that they would be perfect for the Rail Fence.  And the flying dragons lend themselves nicely to Cowboy Corral for Gus.  There is a line of Laural Burch fabric coming this fall - currently November - with a celestial theme/panel that would have been PERFECT for Winter Wonderland. But I didn't want to wait that long to get started. And I didn't want to skip any of the projects.

Of course, in my drive to do things "my" way - I spent a large part of the weekend with an iron in my hand - and I most of the pressing and ironing done for the next three projects.

This also involved two trips to Thimble Pleasures. On Friday afternoon, I pulled the dragon fabric out and headed in to select colors for the rails. The red/yellow/purple will be the rails/frames for the dragons and the blue will likely be the first border.  My next step is to fussy cut 32 dragons from the two yards of fabric.  Tentatively it will be 8 red, 8 blue, 8 purple, 4 green, 4 orange (I DETEST the color orange but the dragons are cute and the quilt is for Gus... but you will not see any orange in the accent fabrics...).  The lighting is not great on the bolt of fabric (may need to pull out my big camera) and it is looking washed out - the dragon at the base of the photo is a medium purple with blue spots - not grey...  We originally picked out a purple dotted tonal fabric, but Gus wasn't wild about it and I remembered that I had the Laurel Burch purple in my stash. Gus is much happier.

The second trip was on Sunday morning.  I decided that I wanted to use the bold paisley (Hoffman Gypsy Princess line) with the Natures notebook fabrics as the Nature's Notebook florals are more muted, for the repeated rail and the border.  So off we went, only to find that they last piece they had in stock was a 1/2 yard precut.  And per the instructions, we need 1/2 yard for the rails plus 5/8 for the border - which means no way did I have enough. And I don't want to start searching the net for it. So I decided to pull in a different fabric for emphasis.  After much searching and help at Thimble Pleasures, I settled on the blue/white delft.  For some reason, when I was cutting last night, I also cut one of the Nature's Notebook florals - so I have 6 strips to choose from. More on that in another post.

Tonight, I start sewing!

A word on Copyrights

Copyright Law is a very complex field, and I am not a lawyer.  Coming from a background first as a University brat and now the wife of a professor (and I also work at a major University), I am very conscious of properly attributing credit where credit is due.  We live by the Honor Code in our household and in our lives.

For the most part, pictures shown on this blog are my intellectual property. And even if I don't take the time to watermark a photo, that doesn't make it less protected.

The exception to this will be pictures from the Quilter's Academy series of the completed quilts.  Because I feel that it will make my blog more colorful and informative, I wrote to Harriet and Carrie on Sunday, August 1st in order to request permission to use pictures from the book. Within hours, I received a gracious note from Harriet allowing me to put the pictures on my blog.    Any time I use one of the Academy Quilt pictures, I will cite my source.

In the September/October issue of McCall's Quilting magazine, they address copyright in relation to quilters.  There is also a wealth of information on the web, so no need for me to repeat it here - but I am going to provide a few links.

  • Copyright FAQ: http://www.quilt.com/FAQS/CopyrightFAQ.html (Quiz is based on Australian law)
  • e-Quilters FAQ: http://www.straw.com/equilters/library/quilt_issues/quilt_copyright.html (the second page has several excellent links)
  • Lost Quilt Come Home: Copyright your quilt:  http://www.lostquilt.com/CopyrightYourQuilt.html
  • Lost Quilt Come Home: Copyright Infringement: http://lostquilt.com/index.php/protecting-quilts/copyright-infringement/

The bottom line for me is this:  if it is not your original idea/original work - then give credit to the original designer and everyone wins.

Monday, August 2, 2010

The completed Rag Quilt #2

I just realized that I haven't posted the finished pictures of the Duke Quilt.  You won't see Gus in this one beyond his fingers and feet as he is "anti-Duke." Shopping for the fabric for this gift quilt was amusing to say the least.. 

I was finally able to give it to the new baby (and even meet the new baby) last week. I received a lovely thank you note including how touched they were that I incorporated the Duke fabric. And the Carolina Blue accents didn't' go unnoticed.

As with my UNC Rag Quilt, I learned from this one (I think I covered most of this in the earlier post). And I'm pleased to take those lessons on to the next quilts.

Sunday, August 1, 2010

Finally Sewing - Class 130 - Lesson 5 - Carrie's Sampler

Never underestimate the value of reading, re-reading, measuring, measuring again... pins, and the trusty seam ripper.

For this project, I chose two reds from my stash. Originally the third fabric was going to be a white with red stars, but it is a bit too creamy in tone to work, so I'll pick up a white sometime later.

I'm using my long Creative Grids ruler for measuring and cutting as it has the grippers on the back - and I'm more accurate with the grippy rulers - less slipping.

I washed, pressed and starched the fabric before getting started.  Mike is still shaking his head in disbelief when he sees me using the iron / ironing board.  My seams came out correctly and I was able to measure the correct 1.5 inches for the center piece - and for the most part the outer strips came out at 1.75. I only had to trim one block to correct it.

Once all of the blocks were sewn and cut to size, I laid them out in order to stack them for chain stitching them. 
Then went to press them.  It was not until I finished pressing and flipped over the set that I found a rather critical error in Row 1 - and I still can't figure out just HOW I did it, but got to practice my seam ripping.
Dash and Monkey came in to supervise my progress...


Dash quickly got bored... and settled in for a nap.

So I soldiered on and worked on my pressing skills.


Overall, I'm pretty pleased with the way this came out.  My pressing skills can use a little more work - as there were a few spots with the open seam that can be seen in the left-hand picture.  I like the way the corners matched as seen in the right-hand picture.  Not all of the corners matched up so nicely, but I do have more confidence in my ability to start on the next projects.

The sampler will be finished over the course of several lessons, and into the Sophomore year.  Here is  the finished sampler from the Freshman year.

This picture is used with the gracious permission of Harriet Hargrave for the purpose of illustrating the project that I am attempting to complete. (I will try to do a better job photographing the quilts in the book - too much glare in poor lighting last night for me).

And below is my center panel - in red.


Back on Track!... Setting up my sewing space.

And no, the seventh time was not the charm...but the new seam guide did. This one fits more tightly and as a result doesn't wobble and I seem to have more control over the fabric.

In the interim, we took an incredible trip to Norway with my parents. I did see two neat log cabin quilts in a small town, but the bulk of the textiles we saw were knitting and knit related.  In Bergen, I purchased a few meters of trim that would be used on the local costumes. I hope to eventually incorporate that into a quilt.  I should have purchased the one I saw in Stavanger as it was perfect for my husband. At the time, I thought we would have substantially more time in Bergen. But when one is reliant on the cruise ship schedule, one can't complain too much.

In June, I found a sewing table on our local Craigslist for a steal.  The one thing it doesn't have, which would be nice, is a lift mechanism to store the machine inside. It does have a small lift which recesses the machine for a larger flat work surface.  So, to keep the dust off, I'm using one of the scarves I brought back from a trip to China several years ago.  One thing I did learn upon returning from our trip was that I should also drape the scarf over the thread holder and spool as there was dust accumulating on top of the thread.

So I now have a dedicated sewing area, though it is currently in our bedroom.  Later this summer we hope to switch some rooms around so that I have a sewing/craft room/office (for Mike) in the larger bedroom and Gus will move into the current office. We are also plannning to redo some of the floors which should be quite an adventure.


One thing about having a limited space is that one must also be careful with one's stash - which is currently underneath the desk.  Not the prettiest solution, but workable. Though after this weekend, I think I've officially outgrown the space...


After I set it up, I was finally able to get an accurate seam!  I lost count of how many times I ripped out seams and eventually cut a few new strips before getting a few sets that came out right.

Something else I noticed this week was the importance of my body position in relation to my machine.  The straighter I am in relation to the needle, the straighter my seam.  So many of my past meandering issues have clearly been operator error.  (Very helpful hint from Page 22/Class 130)
The sewing area replaced a rather large dog crate that we set up in our bedroom back in 2006 when Dash broke his foot.  It stayed up and was used for Monkey's 2007 dislocated elbow, and then again for Dash's 2008 dislocated toe.  ... Fortunately we did not have repeats in 2009 and made it through the spring of 2010 without a Corgi in traction - we are a bit accident prone around here...  So I also hung several paintings that have been waiting for a place to hang. I've had these since childhood. They are by Jo Stripling, who we lived next door to many years ago.  The picture here doesn't do them justice.

I've also brought the ironing board into the space for the weekend as I've been busily washing pressing, and preparing my fabrics for the next several quilts.  I've reread Class 120, several times this weekend, gotten Gus to help get the fabric edges lined up and also dropped a ruler into the seam to weight it for a straight seam when Gus wasn't available.
Speaking of Gus, he is waving brownie mix in front of me, so we need to take a break to make up a batch of "No Pudge! Fudge Brownies."